Firebase Cloud Messaging - Android
前言
最近 Flutter 的專案上剛好需要導入 Firebase 的 Cloud Messaging 功能, 也紀錄一下實作的步驟以及遇到問題。
Firebase Cloud Messaging
Firebase Cloud Messaging(FCM), 是 Firebase 提供的服務之一,
讓使用者進行訊息(message)發送與接收。主要負責:
- 傳送推播(
Notification)與資料(data)訊息 - 提供三種發送方式
- 單一裝置(
Single) - 群組發送(
Groups) - 訂閱群發送(
Subscribed)
- 單一裝置(
- 從客戶端(
Client)發送訊息(雙向)
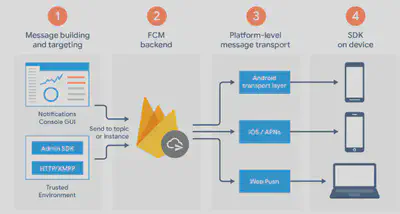
其基礎結構為

Message Type
FCM 目前提供兩種訊息的傳輸模式Notification及Data。Notification是 SDK 在處理的,
而Data是 Client 處理。簡單說,在接收到Notification時,SDK 會將收到的訊息顯示在
手機上的訊息列並根據 Notification Channel ID
決定是否顯示訊息提示窗,而Data可以讓 Client 經過處理後再決定是否要顯示或是執行其他的功能。
就我看來這兩者基本上的差別就是Notification預設有訊息提示窗而Data沒有。
FCM Notification Composer 沒有提供傳送Data的方法,需要使用 Call API 的方式。
主要的步驟只有兩個 - Firebase 的基本設定及 安裝官方提供的 flutter 的 cloud messaging 函式庫 - firebase_messaging
基本設定的部份,官方文件已經詳解了,在此就不加以說明了。
設定 Flutter FCM Library - firebase_messaging
flutter pub 上的文件也已經詳解如何整合至 Android 或 iOS 了,基本上照做都能順利整合。
需要注意的是,如果希望 Client 在點擊訊息時能觸發onResume、oLaunch的 Handler ,
就必需在android/app/src/main/AndroidManifest.xml裡加上 filter
<intent-filter>
    <action android:name="FLUTTER_NOTIFICATION_CLICK" />
    <category android:name="android.intent.category.DEFAULT" />
</intent-filter>
先來看一下各個 Handler 在Notification及Data 的 Spec

讓我們使用 Postman 來測試Notification與Data這兩種傳送方式。
Payload 如下
Notification:
{
  "notification": {
    "body": "this is a body",
    "title": "this is a title"
  },
  "priority": "high",
  "data": {
    "click_action": "FLUTTER_NOTIFICATION_CLICK",
    "id": "high",
    "status": "done"
  },
  "to": "YOUR CLIENT TOKEN"
}
Data:
{
  "priority": "high",
  "data": {
    "click_action": "FLUTTER_NOTIFICATION_CLICK",
    "id": "high",
    "status": "done"
  },
  "to": "YOUR CLIENT TOKEN"
}
觀察 Foreground, Background 及 Terminated 的行為
Foreground:
Notification
觸發 Handler - onMessage
I/flutter (28543): on Message: {notification: {title: this is a title, body: this is a body}, data: {status: done, id: high, click_action: FLUTTER_NOTIFICATION_CLICK}}Data
觸發 Handler - onMessage
I/flutter (28543): on Message: {notification: {title: null, body: null}, data: {status: done, id: high, click_action: FLUTTER_NOTIFICATION_CLICK}}與文件相符。
Background:
Notification
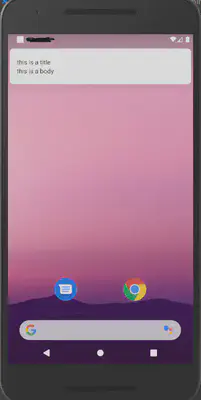
出現訊息提示窗

在點擊後回復 APP 至前景並觸發 Handler - onResume
I/flutter (28543): on Resume: {notification: {}, data: {collapse_key: "秘密", google.original_priority: high, google.sent_time: 1586406396631, google.delivered_priority: high, google.ttl: 2419200, from: 217808926832, id: high, click_action: FLUTTER_NOTIFICATION_CLICK, google.message_id: 0:1586406396651621%4e2e62744e2e6274, status: done}}Data
發生錯誤了!找不到相對應的 Callback function

參考pub 文件 並實作
onBackgroundMessage這個 Handler 後就可以接到資料I/flutter (31277): on Background data: {status: done, id: high, click_action: FLUTTER_NOTIFICATION_CLICK}
Data的反應跟文件上有落差…,文件上表示應該觸發onMessage。Terminated:
因為 Terminated 的狀態會看不到 Debug 的訊息,所以我用 Toast Message 來觀察行為,
Data的部份文件已經表明會遺失,Notification試了之後也發現會出現提示窗, 但自帶的 Data 也是遺失。
Troubleshooting
“PluginRegistry cannot be converted to FlutterEngine” 錯誤
在實作onBackgroundMessage的時候,Application.java如果是參考 pub 裡的實作會發生錯誤

參考此文並實作新的 Class 取代舊的即可解決此問題
接收的到訊息但沒有顯示提示視窗
這問題在下列兩種使用方式都有出現
- 從 Firebase Cloud Message 的 Composer
- 利用 Call API 的方式觸發(如: cURL, postman…)
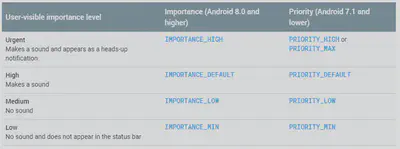
發生原因主要是因為沒有設定 Default Channel ID,其定義如下
解法:
在
AndroidManifest.xml加入下面的 meta<meta-data android:name="com.google.firebase.messaging.default_notification_channel_id" android:value="high" />***測試後發現,如果希望在 Call API 的方式下能正常顯示提示窗,這個 meta 必需存在***在
Application.java裡面實作Notification Channel
結論
FCM 提供了我目前所有的需求了,重點是它是免費的。

補充
20200410
在前面利用 Postman 測試的章節 中,我們只對單一裝置進行測試,
但如果我們希望所有的裝置都能收到呢?
這裡就會必需 Client 端先做訂閱(Subscribe)的動作。
在 Flutter 裡僅需加一行程式碼即可,詳見此文
firebaseMessaging.subscribeToTopic("all");
在 Request 的時候to的值取代成
{
  "notification": {
    "body": "this is a body",
    "title": "this is a title"
  },
  "priority": "high",
  "data": {
    "click_action": "FLUTTER_NOTIFICATION_CLICK",
    "id": "high",
    "status": "done"
  },
  "to": "/topics/all"
}